20 Apr, '22
How to Replace Damaged Wood Flooring Boards – DIY Guide
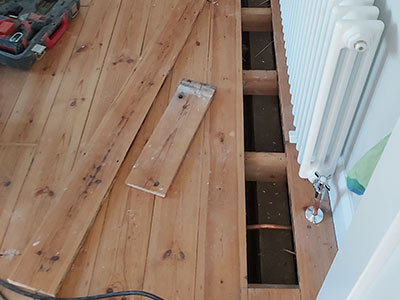
 Accidents can happen even if you are a master at protecting your favourite wooden floor and making sure nothing bad happens to it. Still, accidents will probably happen and one of the best things about real wood floors is the fact that they can be repaired and refinished without the need of lifting the entire floor or replacing it with a new one. Indeed, spot repairs are not only less stress and disruption, but they are also a lot cheaper and can ensure great final results. One of the most common spot repairs when it comes to wooden flooring is the replacement of damaged floorboards or a few damaged ones. Fortunately, this is absolutely possible and a great opportunity that saves you all the nerves, headache, time, stress, and money from replacing the entire floor just because a couple of patches of it are pretty damaged.
Removing and replacing a wooden floorboard is a popular method used by wood flooring professionals but it can also be done by enthusiastic and skilled DIY-ers. It is an easy way to get your floor back to its initial glory, beauty, and sleek appearance and get rid of the damaged floorboards in visible areas and zones of the floor. The majority of the real wood floors are nowadays installed with the tongue-and-groove installation system. This pretty much means that replacing one damaged board and removing it can take some time and requires you to be careful so you don’t affect and damage the rest of the floor during the process. Despite being a bit more on the difficult side, it is not that difficult and complex so it cannot be done by a DIY-er. All you need to do is prepare yourself properly and ensure enough time for the project.
The main thing you want to ensure when you want to replace just a single damaged floorboard is making sure you are not damaging the rest of the floor. Additionally, you don’t want to pull at the floorboard. It may look easier to do and you may be tempted, however, to stop yourself from doing it as this may cause even more harm and damage to the neighbouring floorboards. The tools you will need in order to be able to remove the damaged floorboard carefully and successfully include a hammer, a jigsaw, a circular saw, a chisel, a masking tape, a ruler and a pencil.
Start by covering all the neighbouring floorboards with masking tape and leave the damaged board you will remove not covered in it. Using masking tape for covering the surfaces of the rest of the floorboards around the one you are about to replace will help you ensure you are minimising the risk of damaging them and scratching them during the process of removing the board. Next, use a ruler and a pencil to mark out a rectangle along the length and width of the board you need to remove. This rectangle should be located slightly over a centimetre and a quarter from each of the board’s four ages and this rectangle will later guide you to where you need to cut the board.
Now, after marking the board, you can grab your circular saw and start cutting the board, following the marking you have already done. It is good if you know the thickness of the board as this will allow you to set the saw to the exact thickness. It is recommended to first make a test cut in the middle of the board which will help you to better establish how thick the board is. Once you establish that, you can continue by carefully cutting with the circular saw along the two long sides of the rectangular, then move to cut along the two shorter sides with a jigsaw. As a result, you will get a rectangular hole in the middle of the damaged board you want to replace. Remove the remaining parts of the damaged floorboards by carefully using a hammer and a chisel. Pay special attention to not damaging the tongue and groove of the neighbouring floorboards during the process. Carefully remove any nails from the tongue side of the plank and always try to work horizontally.
Now, once you are done with successfully removing the damaged plank, you are left with finding a new one to replace it. This can be considered a bit harder than removing the old floorboard as finding the perfect match in terms of colour, texture, grain pattern, etc. is not necessarily that easy. Therefore, whenever you are buying a new floor, you are highly recommended to keep a few floorboards left and not used during the installation project and store them for occasions like this one when the floor needs to be repaired and damaged floorboards have to be replaced.