26 Jun, '19
How to Nail Down Tongue and Groove Floorboards
 Wooden floors are, indeed, one of the best features a house or commercial premise can have. They are naturally elegant, beautiful, and suitable for all sorts of interiors from classic to modern, easy-to-maintain, hygienic, durable, lasting, and more. The main reason why real wood floors are so hard-wearing and solid is not only the natural strength of wood, but also the installation method of the floorboards that keep them safe, sound, and solid construction for many years. There is no wonder that one of the most popular ways of fitting the floorboards to the subfloor is by nailing them down. Nailing down the floorboards is a receipt for great stability and a floor that will potentially last you for so many decades.
Nailing the floorboards down is a great method used for the installation of solid wood timber floors, but it is also possible for engineered wood and parquetry. Whether or not you should choose this method for fitting the floorboards depends on a few factors, one of the main of them being the type of the subfloor. Obviously, nailing down the floorboards to a concrete subfloor is impossible. A subfloor of joists is pretty much the best option you can work with. However, if it comes to a concrete subfloor and you still want to benefit from this solid method of installation with the help of nails, it is necessary to invest in a plywood underlay and you can continue with the job.
Nailing down is one of the most complicated methods of wood floor installation, however, it is a commonly chosen and popular one because of the stability and solidness it ensures. However, the method still requires a lot of attention to detail, knowledge, skills, and experience. This is why it is not massively recommended as a DIY project and if you believe that your handyman skills will be more useful for other home improvement projects, make sure to call the professionals. However, if you still want to attempt it and you are confident enough that you can tackle this job down, or you simply want to know more about nailing down wood floor installation although you have already hired a team of experts, make sure to stick to this article and you will be able to learn all you need.
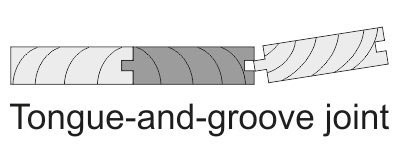
Nailing down is one of the most popular methods choosing not just for the installation of any sort of wooden floorboards, but tongue and groove floorboards more specifically. As the name suggests, these boards have two different sides – one of them being the “tongue” and the other being the “groove”. Thanks to the specific design, these floorboards allow for a specific and widely liked type of installation, the so-called “secret nailing” or “blind nailing” when the nails used for fixing the boards down are completely hidden by the “tongue” side of the boards. Why the method is so popular? Because it pretty much creates the most uniform wood floor surface possible. Still, some people choose to leave the nails visible to the eye as it adds some character to the floor’s overall appearance. However, if this does not suit your interior and style in general and you are going for a more blended, simple, and clean look, hiding the nails by using tongue and groove floorboards and the secret nailing method is a great solution.
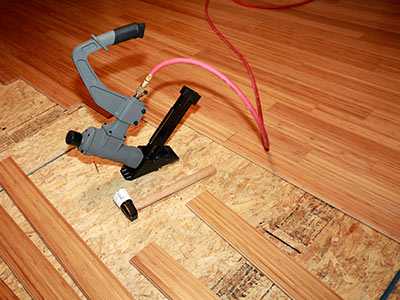
A power nailer is a very common tool used for nailing down the floorboards as it helps the process to happen significantly quicker and to be noticeably easier. However, a power nailer is not a tool that everyone stores away in their garage and rushing out to buy one whenever you decide to install your own floor is not necessary. Of course, renting tools is always an option, but the classic method of nailing down the floorboards by hand and with a hammer is still a good option too. At least if you are not in a rush, since this method will require a bit more time and elbow grease. However, it may be a better option for you if you don’t have any previous experience with installing wooden floors.
The Process of Secret Nailing

No matter if you use a power nailer or simply a hammer, the process of secret nailing remains pretty much the same. Basically, all you need to do is drive a series of nails into the tongue sides of the floorboards at 45-degrees angles. The requirement for the angle is very specific because this is the ideal angle that will then allow you to push every board against the next one, while the nails will hold the whole construction pretty sound and solid. You will be able to continue to the next floorboard once the head of the nail is flush with the tongue of the floorboard. Because the nail is at an angle, it won’t interfere with the groove of the following board as it fits around the tongue. By this, the nail pretty much remains completely hidden.
Why Predrilling is Important?
One of the best advantages of working with a power nailer is that the tool has enough force to drive the nails at a specific angle automatically. However, this is not the exact case when driving the nails in with a hammer as you won’t be able to drive them in with such force as the tool. This is why it is highly recommended to predrill holes for the nails if you are working with a hammer. All you need is a standard drill that will easily make the holes at a specific angle if you hold the tool at the angle you want. Since the drill has enough force to make the holes, it will not break or split the floorboard and, later on, once you start driving the nails in they won’t bend too. The easiest way to make the perfect size holes you need on the tongue of the board is simply by snipping the head of one nail off first and then using it in the drill.
How to Draw the Boards Together?
The process is pretty self-explanatory and all you need to do is fix the boards to each other by pushing the tongue side with the nails underneath the groove side of the next board. However, if for some reason the board you are installing does not fit tightly, you can draw it tight with the help of another tool – a large flat-head screwdriver. You can achieve that by placing a scrap piece of flooring between the screwdriver and the floorboard you are installing and then pounding the screwdriver into the subfloor as you use it as a lever to draw the pieces of board together. Just don’t forget that the nail holes should already be drilled so you can easily nail off the board while you are still holding the screwdriver.
How to Set the Nail Heads?
When hand-nailing the floorboards, you will need a nail set you will use when the head of the nail is ½ inch out. Remember, you don’t have to nail down any deeper than that if you don’t use a nail set, otherwise, the risk of hitting the surface of the boards and breaking, splitting, or damaging it with your hammer is very high. Once you reach the process of top-nailing the boards against the walls, a nail set is very useful and necessary too. Since the boards against the walls are the ends of the floor and there is no more room for secret-nailing these end boards, you have to drive the nails perpendicularly through their faces. The nail set will help you a lot by sinking the heads deep enough for you to fill them.
Pretty much, this is the process of nailing down your floor explained step-by-step. Let us remind you once again, if all of the above-described sounds very complicated to you and you don’t feel confident enough to start a DIY wood floor installation project, we highly recommend you to get in touch with your local wood floor installation contractor and they will do the job for you without any stress and hassle!